Free CA shipping over $150
Saeco Pressurized Portafilter Cleaning: Your Ultimate Step-by-Step Guide
Written by Jennifer Mora
March 24, 2022
Do you own a small Saeco manual machine and you would like to know how to keep the Portafilter clean? If your answer is yes, you’ve landed at the right place! Here you’ll learn how to rebuild the Saeco pressurized portafilter.
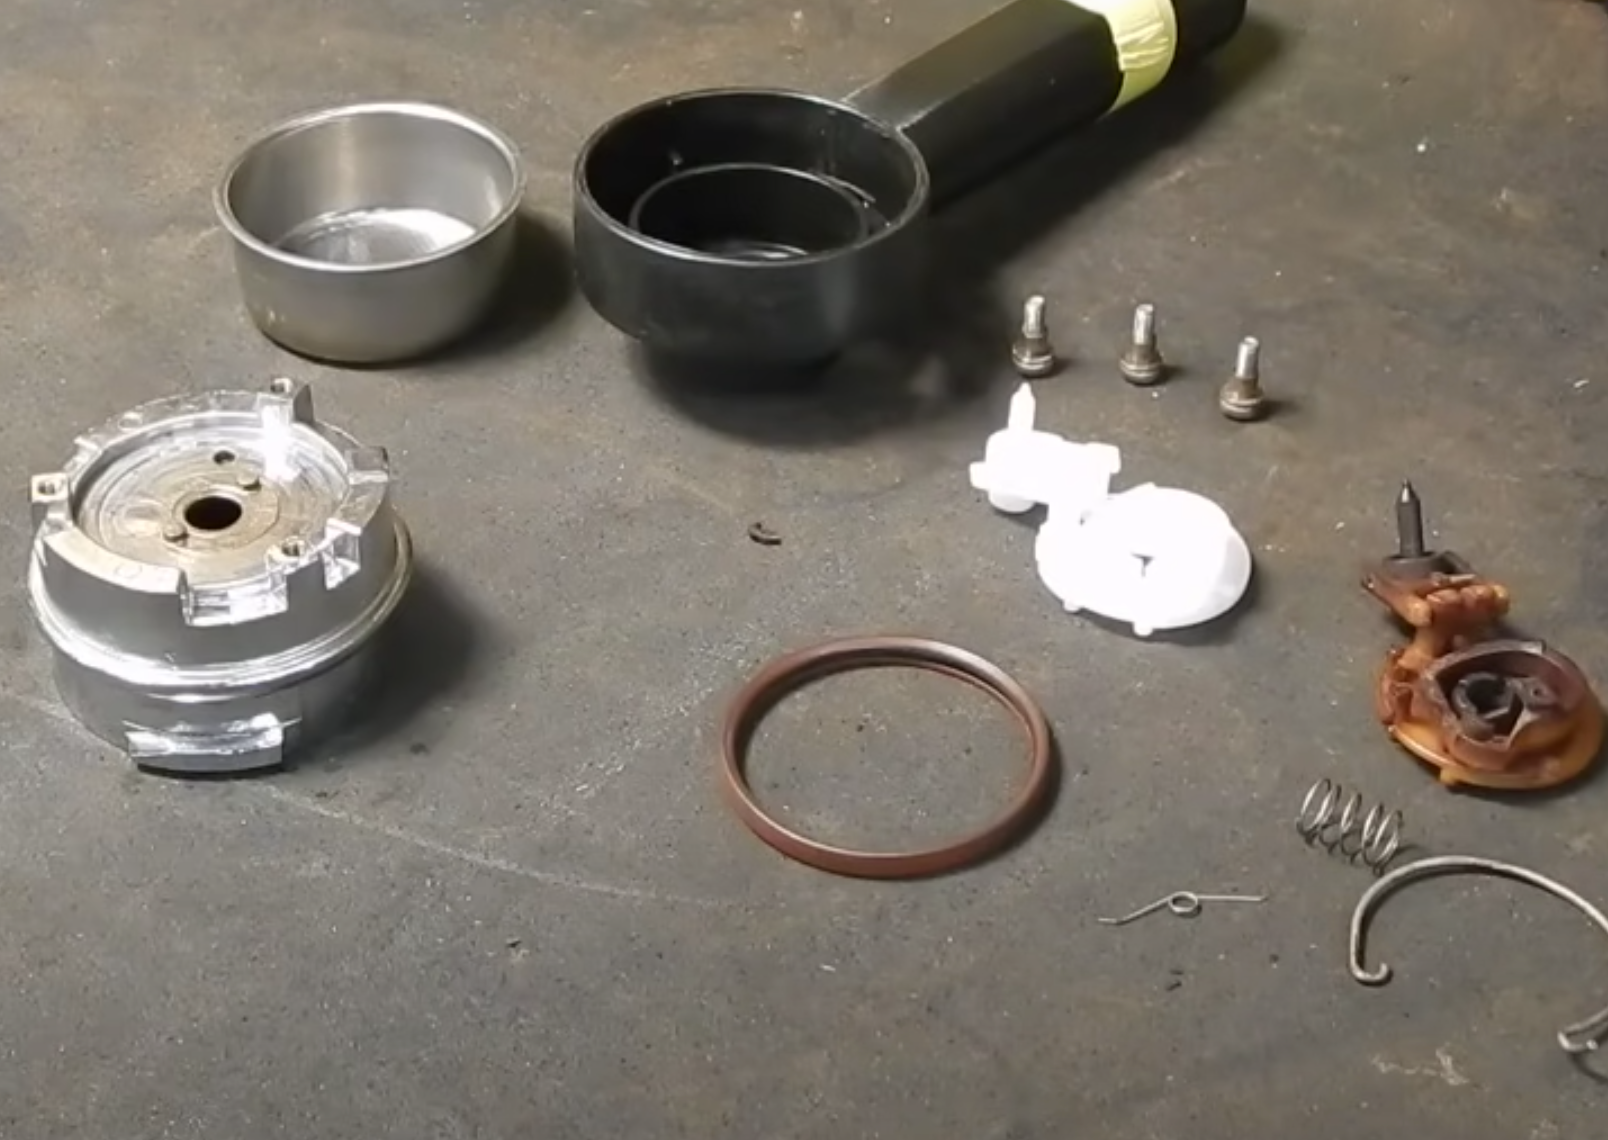
Disassembling
The only tool you’re going to need is the lowermost number two screwdriver. To start, you’re going to pop three screws off. Observe that they have little shoes on them. This permits the machine to continue to slide, even when the screws are in. So don't lose those!

Once you’ve unscrewed the top, lift it, and you will have exposed the mechanism assembly. These springs are really easy to lose, so make sure you keep them aside securely.

Pop the basket out the other side and remove the springs. It will open up the valve assembly as soon as you do that. This pin is what creates up the 30 pounds of pressure! So the whole idea behind this valve is that it contributes to the formation of crema. You will notice that there's a retaining spring on the bottom. Push through to eject the lower plate on this gasket. You’re going to replace this as well. Now, you’re done with the disassembling!

Cleanup and reassembly
Now you’re going to go give these things a good cleaning. So the first thing to do is attach the new gasket to the lower support. Notice that the gasket is directional; the groove inside houses the lower plate (Conveyor). What we want is the big side facing up. So in this alignment, we have the big side on the top of the conveyor. Rubber can be a little bit sticky, so coat its edges to ease entry.

Now you’re going to fit the valve assembly onto the post from the filter holder valve. And you’re going to be aided by a bit of stand. The new valve will have to be fitted with this retaining spring. And, this is probably going to be the trickiest. You're going to notice two posts here. Also, the retaining spring has an arm that goes up. So this would be facing towards the top of the valve assembly. And then, with a little bit of pressure, you can hook it around the other one here. Now, this is laden with tension, and that tension will keep it situated inside.
If you look at the side profile here, you can see that this post is a little bit deeper. It's going to key into this hole here. Set this down on your table and orient the filter or the valve so that this post enters into that keyhole.

The finishing touches
You will hear a satisfying click, and you’re locked on and in place. Next, you’re going to want to return the springs. The loop goes on the post to the right, and then the arm of the spring hooks on. The following spring is easy to drop. It just goes on the top there.

Now for the Baxter base, a single orientation will work here. So you have to note that the portafilter handle is at the hinge side of this valve; drop it down straight, and you should feel right away. If you don't have that spring action, then something's wrong. At this point, it's just a simple matter to return the screws in there with a few shoes on them. Seal the gasket when this clamps into the Portafilter. This action pushes down this basket by that small amount into the seal and creates a lock, and this is how you rebuild your Saeco pressurized portafilter!

Purchase the Saeco Portafilter Built Kit HERE, including the following items:
- O-Ring SKU 145847762
- Filter holder valve SKU 229181800
- Springs SKUs 126768418 and 126769918
- Conveyor SKU 142862959
You can also purchase the Portafilter Kit without the Conveyor HERE.
Or, if you need a complete new Portafilter, you can find it HERE.
You will also find the Saeco Brew Head Rebuilt Kit HERE if your espresso machine also needs extra love.
Watch the video below to have visual guidance on how to rebuild your Pressurized Portafilter step by step.
- Choosing a selection results in a full page refresh.
We take pride in our quality, service and technical expertise
CUSTOMER LOVE
Kathleen Ferguson
Excellent experience with Genius. They diagnosed the problem and repaired my DeLonghi PrimaDonna machine. They did exactly what they said they were going to do, did it on the timeline they predicted and for what they quoted. Communication was clear and the staff were friendly and helpful. They shipped it back to me for a reasonable price. Happy to have the machine back. Highly recommend this company.
Kelly
Clear, open, and friendly(!) communication throughout. I was given an estimate with an in-depth explanation of the anticipated repair and associated costs. The work was completed ahead of schedule and to the highest standard. When I say the machine is now better than new, I mean it: shots of espresso taste the same, but the coffee has gone from “fine” to *incredibly good.* Genius Coffee N’ Espresso stand by their repairs with a 3 month warranty on the work.
Sachin Agrawal
Fantastic group of people that truly know their craft. I have an older machine that unfortunately doesn't have parts available anymore. Despite this, the team at Genius Coffee spent time with me and helped me diagnose the issues. They spent lots of time explaining the way the machine works, communicating technical details and inspected the machine. In the end, I just needed to replace a broken o-ring. The part was a couple of bucks. They invested lots of time in helping me, so while they didn't make money on this transaction, they've won a customer for life!!! I couldn't recommend this place more. Team of truly helpful and knowledgeable people. Excellent communication and customer service.
Brian Kabaluk
Excellent customer service and product knowledge. Would recommend Genius to anyone looking parts or new products
Brian Chodoroff
I ordered a hard to find part (Breville BES870 Pressure Gauge) at a great price with reasonable shipping cost. Easy ordering and tracking. It arrived (to US address) quickly, well packaged (by Irma) and as advertised
James Lee
Staff was knowledgeable and helpful
A A
My experience with this place is always great. I love the kind welcoming and taste of their coffee. They sell high end coffee equipments. ☕️
Murray Thomson
Helpful, responsive, pleasant service. Machine repair queue is long but that’s not a fault of Genius; it’s long at every place I called. Strongly recommend
Daniel Alimohd
Stopped by to pick up a small replacement part for my espresso machine. Staff were friendly and helped locate the part over the phone and reserved it for pickup. The store has all the essential equipment and accessories for your espresso needs. Check it out!
Subscribe to our newsletter
Newsletter Signup
Information
Genius Store
Follow us
!
1 comment
Gary Miller
I have a Saeco Espresso Machine that uses the Saeco pressurized port-a-filter and I’m convinced its the best design available. My question: I have a friend who recently bought a Delonghi Dedica espresso machine and the pressurized port-a-filter is ridiculous. Does Saeco make their port-a-filter to fit other machines?
Gary Miller